Hello everyone, Alan, here on AJH HJA. Did you all have a wonderful holiday? I did it was fun and all, I got presents that I want on my list, had a lovely Christmas dinner with the family, it was good for me.
Yes, indeed, as you read the title, this is my last post here at AJH HJA. The reason is simple. It's me, it's pretty much that I'm at the point were I peaked there is nothing else that I can do creative wise. I pretty much lost interest in making concepts I felt like that I just didn't want to do it anymore.
One day I was going through my files, and then I found some of my old hockey fanfics, and it hit me. I'm like, "this is it! This is what I need for myself," so for me to come in full circle and finally put this fanfic together and start posting them at Alternate History Sports. Hopefully, if things go well, I'll put together a site to archived my fanfic. That's the idea I got.
To add more things to my side of life at my workplace I got promoted to a new job which I have no clue how well I do with my new job, but I have to wait and see if I still able to keep that position or not, and hopefully fit in time to post some of my hockey fanfic.
With that out of the way. I've decided to show you all how I make my concepts over the years. It's a behind the scene of a concept being made by me, but you can follow along the way if you want, so let's begin.
The programs I used are MS Paint and Paint.net.
 I use MS Paint for designing the jerseys and putting numbers and nameplate (name on the back) while the Paint.net I use for size adjustment the logos and shoulder patches. If you don't have the Paint.net program, this link will take you there. It's free to download without any trouble.
Now for templates, it's whatever works for you. I use the Adizero Combo template (it's a combination of the templates from SportsLogos.Net and NHLUniforms.com). Check out the Steven Grant Design template page. Also, check out Jersey Nerds Podcast (formerly known as Hockey Jersey Concept) template page for all kinds of templates to your desire of choosing.
Now that you got the template you like, you can design anything you want on this one there's the usual classic design on a modern template, that's what I'm going to do on this behind the concept making.
I'm going to show you how to put the Atlanta Thrashers classic CCM jersey design from 1999 to 2007 and put it on the Adizero Combo template.


Yes, indeed, as you read the title, this is my last post here at AJH HJA. The reason is simple. It's me, it's pretty much that I'm at the point were I peaked there is nothing else that I can do creative wise. I pretty much lost interest in making concepts I felt like that I just didn't want to do it anymore.
One day I was going through my files, and then I found some of my old hockey fanfics, and it hit me. I'm like, "this is it! This is what I need for myself," so for me to come in full circle and finally put this fanfic together and start posting them at Alternate History Sports. Hopefully, if things go well, I'll put together a site to archived my fanfic. That's the idea I got.
To add more things to my side of life at my workplace I got promoted to a new job which I have no clue how well I do with my new job, but I have to wait and see if I still able to keep that position or not, and hopefully fit in time to post some of my hockey fanfic.
With that out of the way. I've decided to show you all how I make my concepts over the years. It's a behind the scene of a concept being made by me, but you can follow along the way if you want, so let's begin.
The programs I used are MS Paint and Paint.net.

Now for templates, it's whatever works for you. I use the Adizero Combo template (it's a combination of the templates from SportsLogos.Net and NHLUniforms.com). Check out the Steven Grant Design template page. Also, check out Jersey Nerds Podcast (formerly known as Hockey Jersey Concept) template page for all kinds of templates to your desire of choosing.
Now that you got the template you like, you can design anything you want on this one there's the usual classic design on a modern template, that's what I'm going to do on this behind the concept making.
I'm going to show you how to put the Atlanta Thrashers classic CCM jersey design from 1999 to 2007 and put it on the Adizero Combo template.


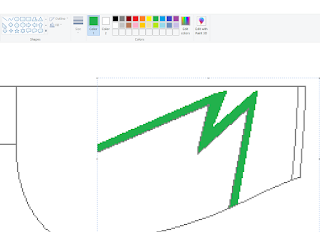
First, on the CCM we will start with the arms clean out the outlines that shape the sleeves until you get the arm stripe you want, then click on the "select" tool, click and hold, size up the desired area you want, back click, select "copy."

Then hit over to your template, before you paste go to your select menu on the bottom that said "Transparent Selection" click on that so that way you can merge both together without any problems, then hit "Paste."

Once you did that position to the right spot, you want to put on the arms.

Now time for making it look classic on the Adidas template, use the "Select" tool, click and hold to the desired area, back click, and hit "copy."

Then click paste.

Back click, highlight "Rotate," then click on "Flip horizontal."

You'll get this.

Place them on your desired spots. Do the same thing for other desired spots that you can see off.
Tip: This link from the Jersey Nerds Podcast page will give you an idea about a few spots to watch out for, including a few other steps by step in that link, too, that can help out.

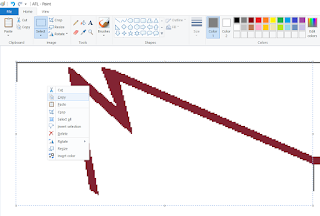
Now to make the arm stripe go complete to the collar. Make a simple shape the same size as the arm stripe you got, then use the "select" tool select your item, then back click, pick "copy," then paste, then place it on your desired spot, then you can stretch it to the right length.

Do the same steps (paste, then place it on your desired spot, then you can stretch it to the right length) all the way to the collar like this.

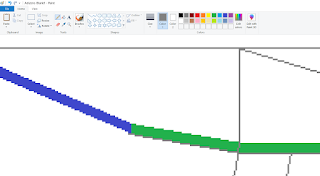
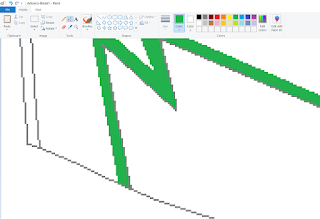
Next, clean up your arm up, then go to your tools and select "Color Picker," use the grey outline colour (R:128, G:128, B:128), then use the "pencil" tool or "line" tool in thin line form and go along your stripe.

Until you get to the end.

You can do the same with the other arm of your jersey, flip it horizontally, place it.

Continue the same steps for the back, some templates on the back of the jerseys are different from the front, so be careful. Once you have done, it'll look like this. You just put together arm stripes.
Now it's time for the hem stripes, just like the step by step on the arms.

Copy your hem stripe then paste. On this hem stripe that has patterns that will be too wide for it to fit in the hem. Here's how.

First, fill pieces on the back of the jersey with the "paint bucket" tool, use the "select" tool size up the collar, hit "cut" head over to your back of the jersey, paste it, place it on the back collar and it's done. Then hit "select" click and hold, size up the desired area you want, then move it away from the hem area.

Finish the hem stripe across with the "copy," "paste," drill.

Next, grab the piece that you put aside and put it back on its original area (the best thing without any problems do the usual "copy" and "paste").

Clean it up, and you got the front done.

Do the same steps for the back of the jerseys than there you go you just complete the hem!
Well, it's time for the collar. Many different kinds of collars you can use for this one it's the Adidas collar.
Here's how I put together Thrashers collar my style.

I took this collar from my old Atlanta Thrashers concept just for this one. O.K. clean the gray outline from the collar then do the usual. (Select, size it up, copy, and paste.)

Once you paste it, set it on top of your collar.

Hit Select, size up on the blank collar, paste it, clean up any unnecessary spots, size up the collar, hit "cut" head over to your back of the jersey, paste it, place it on the back collar and it's done.

The front of the jersey is the same steps as you did with the back of the collar.

Select, size it up, copy, paste and place it to your desired spot.

Hit Select, size up on the blank collar, paste it, clean up any unnecessary spots, size up the collar, hit "cut" head over to your front of the jersey, paste it, place it on the front collar, and it's done.

Once you are done time to use the "paint bucket" fill the areas for your jersey.

And here you have it, you just put together a classic Atlanta Thrashers design on an Adidas template.
Now it's time for the logos. This one you need the Paint.net program to resize your logos, but first, we got to make a box, what is that? Well, it's a box you prepare to put on your first jersey, so once you place it and you can easily paste your logo on top of it with no problem.

Usually, the width is 131 pixels, but sometimes it's the concept artist digestion on whether or not make the logo broader or thinner. To make the box as I called it, select the "line" tool, make sure it's at 1 pixel, make the line down, next center it by place it under the collar. Then select "Rectangle" line, use your math to square your box, with your math for 131 pixels take away 1 pixel, then divide 130 with 2 and you get 65 so make 65 pixels on one side of your line, and another 65 pixels on the other side of your line and there it is your box is ready to place your logo on top of it.
Tip: If you want to make it wider like make it 151 pixels, make sure you add 10 more pixels on each side to make it 151 pixels.
Next, the best place to get your logo is from sportslogos.net, then copy it, paste it on Paint.net or MS Paint, then crop it so you can get a better result for your resizing your logo, then copy it and paste it on your Paint.net.

Now before we resize, there is a tool from Paint.net called the "Magic Wand" you can easily colour your logo so that way in case you want to recolour the logo the way you want with ease.

Tip: with the "Magic wand," there is a section that said "Tolerance" makes some adjustment (more or less) so that you won't have problems with filling colours and end colouring more than one spot.

Now, click "Image" select "Resize" as you see here this is what it looks like, click on the "width" then type out "131," hit "OK" and your logo is the size ready to be placed on your jersey.

Hit "Edit," click "Select All."

Hit "Copy."

Go back to your jersey.

Then hit "Paste" position your logo on top of your box.
You can make some adjustments like moving the emblem up or down to your desired spot.

And here you go, you just put a logo on the jersey.
Now on to the shoulder patch logos. Do the same steps as you did with the primary logo. The only difference is the width of your shoulder patch is 50 pixels.
Once you do that, paste it away from the jersey so I can show you how to put them on the shoulders.

Tip: Use the "Rectangle" line tool then size it around the logo so that way you can make sure that both sides of the shoulders are even.

Before you do anything with the logo, click on select and click "Transparent Selection." that way, if you're going to rotate the logo, you won't lose half of it.

For example, this would look like if you rotate it with the "Transparent Selection" on.

Now, use "select" size up your logo spilt your logo in half, pull it away from each other. Once you do that, click on "rotate right 90 degrees."

Before you cut and paste it, get the "Paint Bucket" to make your background colour white, then you can select, cut and paste.

Paste it on the shoulder, whatever spot works for you.

Then grab yourself the "Paint Bucket" and "Pencil" tools and clean them around the logo.

Then do the same step for the other side and the back of the jersey, and there you have it, the shoulder patches are done.
Now it's time for the nameplate (aka names on the back) and numbers.

The font I choose for the nameplate is the Atlanta Thrashers' old font that they used from the beginning to the end of their time in the NHL.
Tip: You can also add trims around the letters, but you have to use the "pencil" tool to do that. I prefer you use Paint.net so you can use a magnifier tool to close up on the letters so you can add the trims around them better.

First, find a spot to work on putting together your name.
Then grab the line tool 1-pixel size.
Make a straight line not too long, just enough so you can put your name on top of it.
For that reason, so that way, your name will be straight and look good.

Before you start the steps, make sure that your background colour is white.

Then you start the three steps. Select size up your letter, copy, then to your line paste.
Before you add another letter to it, grab the pencil tool and make dots to make space between your letters.
Usually, it's 2 to 3 pixels apart between the letters; however, if you have a font that has tips on any ends of a letter, you might have to give it one or two pixels extra space apart.

Continue to copy a letter and pasting it on your nameplate until your name is complete.

Now, get the "rectangle" tool, use the grey colour and size it up and give it 2 or 3 pixels space around the letters.

Clean it up and colour the letters, and there you go, you just made a nameplate.

Now it's time to center the nameplate, Alan's style. First, click on the "Eraser" tool. Next, click on the "Size" and click the biggest size on that list. Lastly, pick any colour for the background (aka colour 2).

Now, you can begin clicking checkerboard style back and forth from each end until you reach the middle.

When you get to the middle sometimes you got to make your "eraser" tool a bit smaller, sometimes if your nameplate isn't 1-pixel center, you'll have to use the "selection" tool and find one letter on your name for this example on my name it's either the "H," "B," or "T."
I choose the "B" move it over or in which works for you.

Get the "line" tool one-pixel, pick a different colour, then make a line in the middle.

Clean your checkerboard, and there you go, your nameplate is ready to be put on the back of your jersey.
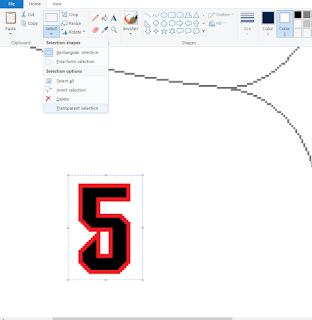
Now it's time for the numbers, but I decided to throw a curveball on this and go with different font on this one because this is a concept making you can do whatever you want to put on.

This font is the Milwaukee Admirals' current font that this team use.
Before we put these together, I will show you how to add trim around the numbers.


If you want to add trims around the numbers and letters make a square dot (2x2 or 3x3 pixels) use select, size up your dot, copy, then paste and set it along the edge of your item then repeat the paste and place it along the side, there are some spots you have to stretch it longer.

You can do these steps on MS Paint, or Paint.net witch ever works for you.

Now, to put your numbers together, just give some space between your numbers.
Remember the nameplate you did earlier, you can do the same on the numbers mainly if your number is "19" or "6".

Once you center it, make a line on your center.

It is time to put both your nameplate and number on the back of your jersey.
Grab your "line" tool, make a triangle to find your center.

Then make a line down the center no matter how long you want for this one. I'm just making it 3 pixels long so that way I can place the nameplate both centring it and spacing it from the yoke area.

Use the "Select" tool, box it around your nameplate then "cut" it.
Remember to make sure that the "Transparent Selection" has the checkmark on it (in MS Paint you can hit "Shift "T," and it'll have a checkmark on it)

Go to the back of the jersey, paste and match the lines that you place on both the back of the jersey under the nameplate to the center.

Next, make the line down the center underneath the nameplate, then grab the "eraser" with big size form and different background colour, click it under the nameplate so that it gives a space between both the nameplate and the numbers.
Once you did that, make sure that the background colour is white before the next step.

Head over to your numbers, then use the "Select" tool, box it around your numbers, then "cut" head back over the back of the jersey hit "paste" and place it on the centerline and under the square box, you made with the eraser.

Finish it off with cleaning the lines and square box, then colour your letters and numbers to match the team's colours, and there you have it, you just put together both nameplate and numbers on the back of the jersey.

It is time for one many up and coming concept artists flaws that most seem to forget to even not putting on the arms correctly, it's the TV Numbers.

Grab your number, use the select tool, square it around your number, make sure you turn off the "Transparent Selection," so that way, you can rotate your TV numbers without problem.

Click over on the "Rotate" section and rotate it.

Now before we cut and paste the TV number, we got to use the "eraser" with big size form and different background colour; click it on the arm, so with that, it gives a space between both the shoulder patch and the number.

Now, use the pencil tool (or the line tool one-pixel size) make two-pixels space from the grey outline, that's where your number should be placed unless you have an odd size combo numbers.
Do the same step by step as you did with the nameplate, but you don't have to worry too much on whether it center or not you can easily split it in half, rotate it, and paste it on the arms and you are good to go.

Turn on the "Transparent Selection," then use the selection tool square it over your number and cut.

Paste it on your arm where you want to place it.
Repeat the same steps on the other arms.
Then colour them to their right colours.
But you ask, "what about that one spot under the front jersey armpit area?" Well, let me show you.

Use the paint bucket tool and fill the armpit area.

Get the selection tool square it on the armpit area and move it to a side, keep it there until you are done with the TV number.

Next, head over to your already made TV number (left side of the front jersey) change the colour around the figure to white.
Now, grab your selection tool, square it around it.

Click "copy" your number along with your grey outline to make progress a bit better for yourself.

Now, back over to your back of your jersey, then "paste" and place it on the right spot.

Head over to your armpit that you put aside, use the selection tool, square around it, click "cut."

Back over to your back of the jersey, click "paste" and set it where it was before.

Clean up unnecessary area, and there you go! You just complete the TV numbers.

And there you go, your jersey is complete! With these steps, you can make the colour version with ease to maybe shortcut it without me having to show you how to do it.
The size for Players # on the back of the jersey is 120, TV numbers are 40, and letters for the nameplate are 28.
These may not be going to be the same for any font style you like, you have to play with sizes for the right fonts to even if you're going to add trims around them, once you get the hang of it you'll be alright.

Now, it's time for the "Presentation."
You can do whatever you want to do, but the true golden rule in concept making is to put your "ID" with your concepts, whenever it is your real name, user name, nickname, or whatever works for you. If you don't do it, chances are someone will steal your work and take the credit, which won't sit well with you at all.
Here is the stuff you need to make a simple presentation.

Helmet: You can colour the helmet to the desired colours for the dark jersey while the white helmet for the white jersey or any light colours you want.
You can add a logo on the side of the helmet.
You have to play around with the right size for your helmet, whether it's the team logo or wordmark logo.

Pants: Another piece of equipment that plays a key factor in your presentations.
You can add stripes on the side of the pants to even add a logo to it, too, whatever works for you.

Socks: You can make stripes based on the jerseys or whatever you desire.

Gloves: There are so many designs of glove templates you can find to colour them the way you want them to be made.

A title to show what team you just made, including teams from a league that no one ever heard of.
Add your ID to your desired spot.
And your concept is done!

I never thought that my last concept would be the Atlanta Thrashers, but meh might as well.
And so this is the end of it all, so many concepts made, so many concept artists I shared with, and so many memories.
As I turn a new page in my life, from doing hockey fanfic to getting a new job promotion (how long that last I don't know), it's going to be rough, so I'll see what I'm in for.
Until then, goodbye everyone, I will miss you all.


